

Cytopathology
Palpation guided fine needle aspiration
FNA & core biopsy procedure
Copyright: 2002-2024, PathologyOutlines.com, Inc.
PubMed Search: procedure fine needle aspiration
Palpation guided fine needle aspiration
FNA & core biopsy procedure
Author: Joseph D. Jakowski, M.D.
Last author update: 1 August 2013
Last staff update: 14 November 2023 (update in progress)
Copyright: 2002-2024, PathologyOutlines.com, Inc.
PubMed Search: procedure fine needle aspiration

Table of Contents
Definition / general | How to obtain education and hands on training in US medicine and USFNA | Background of FNA procedure | Pre FNA procedure events | Performing the FNA procedure | Clinical imagesCite this page: Jakowski J. FNA procedure. PathologyOutlines.com website. https://www.pathologyoutlines.com/topic/cytopathologyfnastepbystep.html. Accessed May 6th, 2024.
Definition / general
- Before making the transition to USFNA on patients, one must practice on either homemade or commercially available phantoms until the operation of US machine and needle placement skills are automatic
- To ensure the best outcome for the patient from the FNA procedure, you must:
- Clinical assess patient prior to procedure
- Adequately perform the FNA biopsy
- Make observations during the procedure
- Prepare quality smears
- Perform microscopic interpretation
- Report the results (Cancer Invest 2004;22:620, Demay: The Art & Science of Cytopathology, 2nd Edition, 2011 (vol. 2, pg. 543-47))
How to obtain education and hands on training in US medicine and USFNA
- CAP offer assessments with a certification of completion and ACE offers pathways to USFNA certification for pathologists
- College of American Pathologists (CAP): Ultrasound Guided Fine Needle Aspiration AP3 Course
- The American College of Endocrinology (ACE): Diagnostic Endocrine Neck Ultrasound and UGFNA Course
- American Association of Clinical Endocrinologists (AACE)
- United States and Canadian Academy of Pathology (USCAP)
- American Society of Cytopathology (ASC)
- American Institute of Ultrasound In Medicine (AIUM)
- Visiting a pathology practice that currently performs USFNA and offers educational training
- Attending US manufacturer sponsored workshop
- Web based US medicine education sites (e.g. sonoworld.com)
- Video based US medicine and USFNA programs (e.g. American Institute of Ultrasound In Medicine (AIUM) DVD video series)
- Becoming credentialed, for example, as a Registered Diagnostic Medical Sonographer (RDMS) through the American Registry for Diagnostic Medical Sonography (ARDMS)
Background of FNA procedure
- Each single needle pass should take less than 5 - 10 seconds to complete, with 10 - 20 excursions (back and forth cutting motions of the needle) into the target being performed during this time
- When sampling vascular targets or the thyroid gland, single pass should take 2 - 5 seconds and use smaller gauge needles (e.g. 25 or 27 gauge), to decrease hemodilution of the FNA specimen
- Usually 2 - 6 passes are performed on the target for adequate sampling
- Using needle only or using an aspiration device with suction may be employed
- Number of slides produced from each pass will vary on how you are planning on triaging the material obtained and the smearing technique used:
- In general, produce 1 - 2 slides per needle pass for diagnostic purposes but usually not more than 4 per pass
- Needle rinses in a preservative solution (formalin or RPMI) or additional unstained slides may be obtained for special studies (e.g. fungal and acid fast stains)
Pre FNA procedure events
- Focused patient history and physical exam:
- Obtain patient history
- Determine site to be biopsied
- Review any pertinent radiographic imaging and laboratory studies
- Inquire about any significant medical problems including bleeding disorders, anticoagulation, previous episodes of syncope or complications and perceived problems from other previous biopsy procedures
- Inquire about special clinical requests (e.g. additional materials for hormone studies in recurrent breast cancer, material for microbial cultures, thyroglobulin wash out)
- Perform a focused physical examination of the aspiration target / site, noting the characteristics of the target:
- Location relative to other anatomical structures
- Estimated depth from skin
- Consistency (firm vs. soft or solid vs. cystic)
- Mobile vs. fixed
- Any evidence of pulsation or bruit
- Pre plan the aspiration biopsy:
- Pay special attention to:
- Proper patient positioning to access the target
- Technique to best immobilize the target
- Estimated needle length and size
- Use of suction or not during the biopsy
- Special collection methods needed (e.g. RPMI for flow cytometry, cell block, sterile container for cultures, or collection / drainage of cyst fluid)
- Explain biopsy procedure in lay terms, obtain informed consent, and reconfirm site of aspiration
- Special mention to the patient that several passes (averaging 2 - 6 passes) may be necessary to obtain adequate cells for diagnosis and any ancillary studies
- Address any patient concerns about the procedure BEFORE proceeding
- Ready aspiration setup and supplies (needles, syringes, slides, special collection tubes for any additional studies)
- Pay special attention to:
Performing the FNA procedure
- Always follow "universal precautions"
- Locate and immobilize target again with one hand
- Disinfect the skin with alcohol (70%) at site of planned needle puncture site
- Pass the needle through the skin in one quick motion
- Usually needle approach is 30 - 45 degree angle to the skin for very superficial targets and a more perpendicular approach for deep targets
- Advance the needle into the target
- In most cases, the aspirator will notice a difference in the consistency of the tissue of the target when penetrated
- If the target is small, one usually directs the needle toward the center of the target; if the target is large and there is concern for central necrosis, the needle should be aimed toward the periphery
- Once in the target, you may apply suction if using an aspiration device, and then the needle is moved in long back and forth cutting motions within the target (DO NOT let the needle come out of the skin during this motion)
- When blood or material appears in the hub of the needle the aspiration should be stopped
- PRIOR to withdrawal of the needle if using suction, negative pressure must be released to prevent suction of the material into the barrel of the syringe when the needle exits the skin
- Release the negative pressure by letting go of the plunger BEFORE removing the needle from the skin
- The plunger may or not return to the staring position
- DO NOT force the plunger down
- Remove the needle from the patient by pulling straight out so as not to lacerate the skin of the patient by angling the needle upon withdrawal
- Apply pressure to the aspiration site, preferable by an assistant
- Prepare smears (see smear making) and obtain needle rinses as needed
Clinical images
Contributed by Joseph D. Jakowski, M.D. and Susan Meanor, R.T., R.D.M.S.
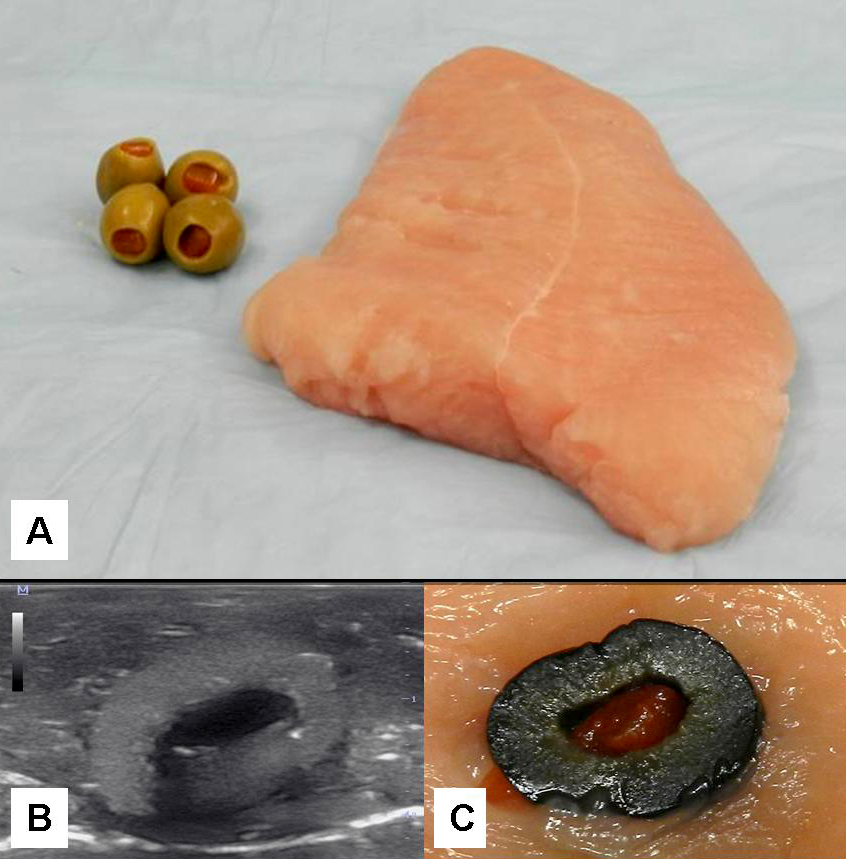
Turkey phantom

